Yum Extender User Guide
Yum Extender 0.99 User Guide for CentOS
Yum Extender User Guide
Last Updated: 2006-03-05
Original Authors: (Fedora Core Version)
- Hrishikesh Ballal
- Tim Lauridsen
Modifying Authors: (CentOS Version)
- Johnny Hughes
This material may be distributed only subject to the terms and conditions set forth in the Open Publication License, v1.0 or later (the latest version is presently available at Opencontent).
Abstract
This document shows how to use Yum Extender client (version 0.99) and perform common software installation and removing tasks. All screen-shots are taken on Yum Extender with CentOS 4.
1.0 Introduction
Yum Extender - by Tim Lauridsen - website
Yum Extender is a GUI front end for Yum. See the CentOS 4 manual Managing software with Yum for more details about yum operations on CentOS 4. Yum Extender is available for CentOS 4 and this guide was written for version 0.99. Yum Extender is available in twelve languages and is completely written in Python.
Yum is an automatic updater and package installer/remover for rpm systems. It automatically computes dependencies and figures out what things should occur to install packages. It makes it easier to maintain groups of machines without having to manually update each one using rpm.
With Yum Extender, you can install, remove and update software from selected repositories. Yum Extender lets you add and remove repositories and works seamlessly with yum.
2.0 Features
Yum Extender allows you select which repositories to use while updating, installing or removing packages in CentOS. Yum Extender can search for a particular package in the available repositories. You can also switch repositories ON or OFF.
The newest version of Yum Extender adds a Queue section so updates, installs and removal of packages can happen after all selections are made. There is also a group section to allow operations to happen with groups of packages.
3.0 How Yum Extender Works
Yum Extender is a client written completely in Python. It works seamlessly with Yum. Yum Extender uses yum's /etc/yum.conf file and /etc/yum.repos.d/ directory to configure the repositories. It reads yum plugins defined in the yum configuration.
Yum Extender provides a GUI that uses yum APIs to manage packages on your system.
4.0 Installing Yum Extender
Yum Extender is available as a part of the CentOS Extras repository of CentOS 4. Install Yum Extender by typing the following command as root:
yum install yumex
5.0 Starting and using Yum Extender
After installing Yum Extender, you can access the software by clicking on the CentOS menu then navigating to System Tools. There you should see a menu item for Yum Extender. After selecting this menu item, you will be prompted to enter the root password. Yum Extender will start and will scan available repositories and installed packages. It will develop a list of packages that need updating, packages available for install, and packages available for removal.
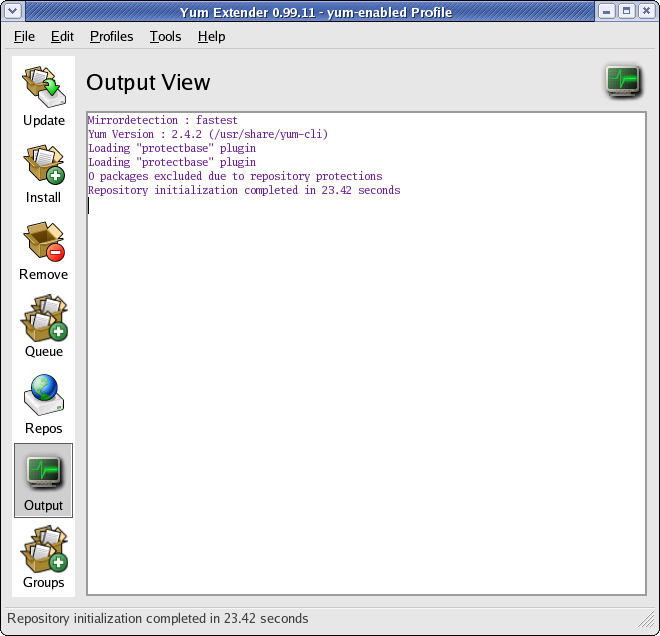
There is a row of Buttons on the left side of Yum Extender to control the section of the program you will enter. Yum Extender starts in the Output Section. This section is where commands write their output.
5.1 Update Operations
To enter this section, you would press the Update button on the left side of Yum Extender. You will see a list of packages that are available for update. You can select the packages you wish to update by selecting the check box and add them to the Yum Extender Queue by pressing the Add to Queue button. There are also Select all and Deselect All buttons to help with package selection. Once a package is selected and moved to the Queue, there will be a Green check mark beside that package.
Once items are in the Queue section of Yum Extender, you would click the Queue icon to update the packages, please see Section 5.4 - Queue Operations.
You can use Selection Filters to help you find packages, please see Section 6.1 - Selection Filters for details.
5.2 Install Operations
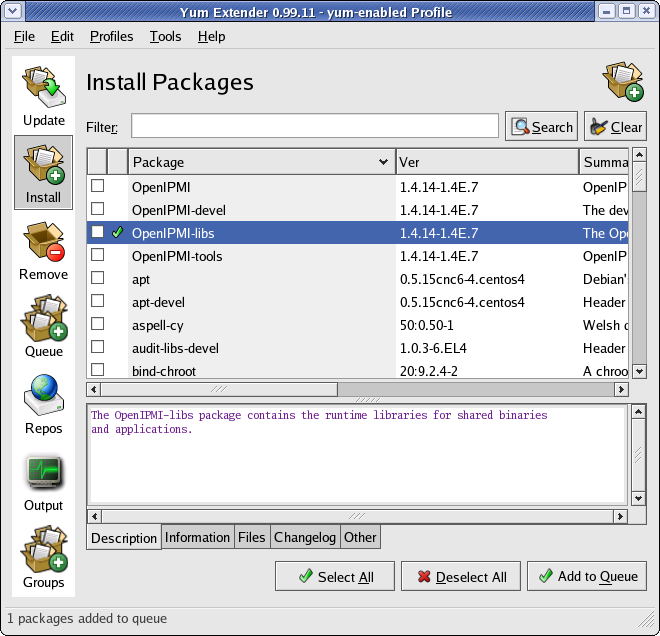
To install a new package click on the Install button on the left side of Yum Extender. You will see a list of packages that are available for installation on your system. You can select the packages you wish to install by selecting the check box and add them to the Yum Extender Queue by pressing the Add to Queue button. There are also Select all and Deselect All buttons to help with package selection. Once a package is selected and moved to the Queue, there will be a Green check mark beside that package.
Once items are in the Queue section of Yum Extender, you would click the Queue icon to process the Queue, please see Section 5.4 - Queue Operations.
You can use Selection Filters to help you find packages, please see Section 6.1 - Selection Filters for details.
5.3 Remove Operations
To enter this section, you would press the Remove button on the left side of Yum Extender. You will see a list of packages that are available for removal. You can select the packages you wish to remove by selecting the check box and add them to the Yum Extender Queue by pressing the Add to Queue button. There are also Select all and Deselect All buttons to help with package selection. Once a package is selected and moved to the Queue, there will be a Red X beside that package.
Once items are in the Queue section of Yum Extender, you would click the Queue icon to update the packages, please see Section 5.4 - Queue Operations.
You can use Selection Filters to help you find packages, please see Section 6.1 - Selection Filters for details.
5.4 Queue Operations
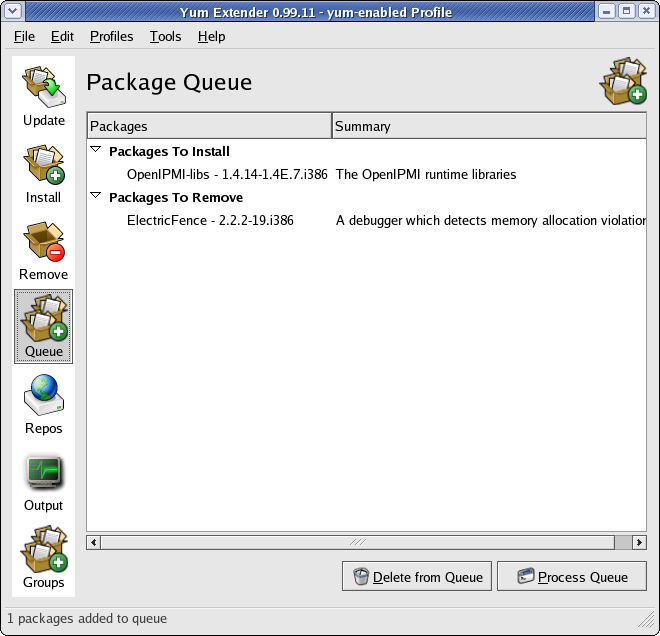
To enter this section, you would press the Queue button on the left side of Yum Extender. You will see a list of actions that are going to be accomplished as selected in the Update, Install, or Remove sections listed above. If there are actions listed in the Queue that you do not want to take place, you can select that transaction and use the Delete from Queue button to remove it from the Yum Extender Queue.
When you have made all your adjustments to the Queue and you are ready have all the actions listed in the Queue happen, press the Process Queue button.
5.5 Repository Operations
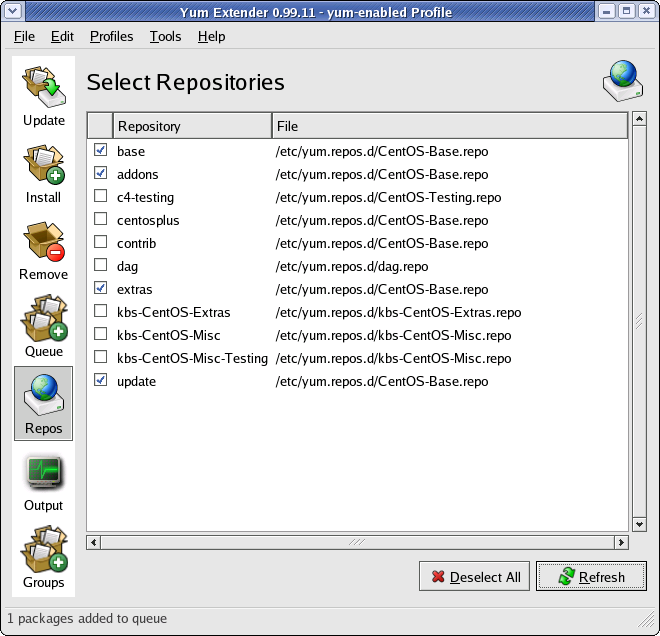
To enter this section, you would press the Repos button on the left side of Yum Extender.
Yum repositories that are already included in your /etc/yum.repos.d/ directory or in your /etc/yum.conf and enabled will be checked. Repositories in those above locations that are disabled will be unchecked. You may check or uncheck repositories and then use the Refresh button to recalculate the package information.
After making changes to your repositories and refreshing, you can then go to the Update, Install or Remove sections and take actions as outlined above.
![[Important]](/HEADER.images/important.png) | Repository Compatibility |
|---|---|
|
Some users report problems when non-CentOS repositories are used. Some 3rd party repositories might replace important CentOS files as dependencies during package resolution and installation. This sometimes causes system instability. Please make sure you have read and understand Understanding Repository Compatibility. CentOS will list repositories that are generally safe for use with yum in that document, but it is important to understand what adding 3rd party repositories might do to your CentOS installation. |
5.6 Group Operations
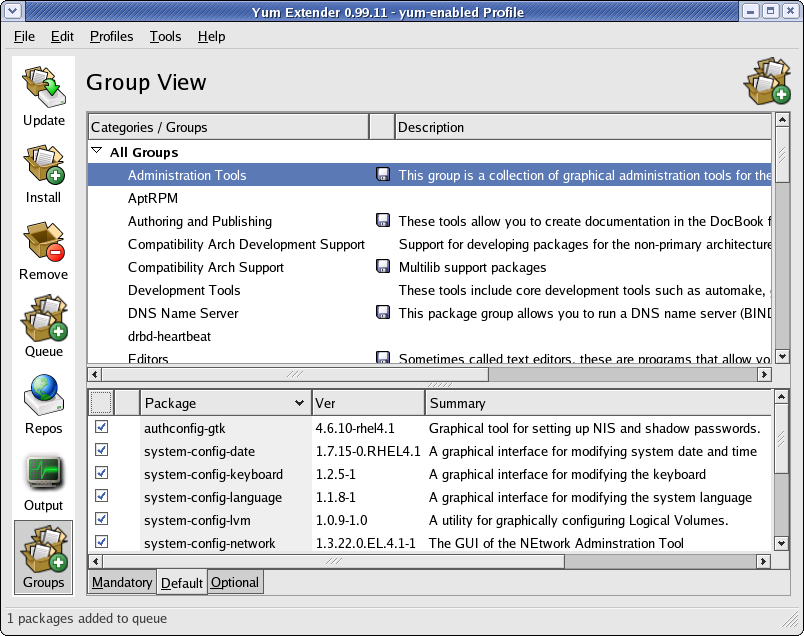
To enter this section, you would press the Groups button on the left side of Yum Extender. The group section works with groups that are defined by the repository provider.
The group section has two windows. The top window is the Group Window, the bottom window is the Package Window.
The Group window contains the name of each group and there is a 2nd column that has a picture of a Disc if all the files in a group are installed. If the 2nd column is blank, there are files in that group available for install you your machine. If you right-click on a group in the Group Window, you can add that group to the Queue for installation.
The Package Window has a Mandatory, Default, and Optional tab. Each tab contains a list of packages for that category in the Group that is selected in the Group Window. Mandatory and default packages are installed when a group is installed, optional packages are not.
The first column in the Package Window contains a check box that shows if a package is installed or not. You can not make changes to the boxes in that column, they are for information purposes only. If you right click on an uninstalled package in the package Window, you can add that package to the Queue for installation.
Once items are in the Queue section of Yum Extender, you would click the Queue icon to update the packages, please see Section 5.4 - Queue Operations.
6.0 Using Filters in Yum Extender
Filter in Yum Extender is used to limit the number of packages shown in the active view. All kinds of filters can be used together. Filters are applicable to the Update, Install and Remove sections of Yum Extender.
6.1 Selection Filter
The selection filter is a way limit a view to show only selected packages. The filter is enabled/disabled by clicking the header of the selection column (the first column). An X is shown in the column header when the filter is enabled.
6.2 Recent Filter
The recent filter is a way limit a view to show only recent packages. Recent packages are that are added/updated in a repository or installed on the system in a recent period of time (default is 14 days). The filter is enabled/diabled by clicking the header of the recent column (the 2nd column) of the Update, Install or Remove sections. An + is shown in the column header when the filter is enabled.
6.3 Word Filters
Word filters is words or part of word to search for in:
- Package Names
- Package Summary
- Package Descriptions
Just enter the word in the filter entry and press Enter or use the Search; button to apply the filter. When filter word are applied, only packages that contains the words are shown. Clear the filter entry and press Enter or press the Clear button to disable the word filters.
6.4 Special Word filter
Yum Extender have the following special word filters.
6.4.1 Architecture Filter
The architecture filter is used to only show packages with a special architecture. Use
arch=<Architecture>
in the filter entry to only show packages with the given architecture.
Example:
arch=i686
Now only packages with the i686 architecture is shown. You can use the "Search" and "Clear" buttons to show or reset a filter.
6.4.2 Repository Filter
The Repository filter is use to only show the packages from a given repository. Use
repo=<Repository Tag>
in the filter entry to only show packages from the given repository.
Example:
repo=extras
Now only packages from the extras repository are shown.
7.0 Getting help.
There are several places that you can get help with Yum Extender for CentOS. You can get help at the CentOS 4 forums, the CentOS Mailing Lists, or use the #centos IRC channel.
8.0 Bug Reports
Users are also encouraged to report bugs, use the CentOS Bug Tracker to search or report bugs with Yum Extender for CentOS.
9.0 Yum Extender Configuration
9.1 Mirror Detection
Yum Extender features a script that detects the fastest mirrors for a repository, this is done by a routine written by Luke Macken, it spawns a thread for each mirror in a mirrorlist and measures the connection time. The mirrors are sorted so the fastest one is used for a particular session. While it takes sometime when starting, this feature is recommended is you are using Yumex to install large amount of software. Yum Extender also contains a modified edition of the fastest mirror detection called best mirror detection, it finds the fastest and most recent updated mirror, by looking at the Age of the mirrors repomd.xml. It was written by Willem Riede. The type of mirror detection can be selected in the preferences dialog. There are 3 options.
- Default (yum default)
- Fastest (Fastest mirrors used first)
- Best (Most recent updated and fastest mirrors used first)
If you use a proxy server, then use only the Default option
9.2 Using a Proxy in Yum Extender
Yumex now features proxy support. If you system is behind a proxy firewall, your have to define your proxy server in the Yum Extender Preferences. The proxy server has the following format.
http://<User>:<Password>@<proxy hostname>:<port>
Example.
http://myuser:mypassword@proxy.mydomain.com:8080
The format is the same as used by http_proxy= in a shell.
9.3 Excluding packages
Yum Extender contains an option to exclude specific packages. Select 'Edit->Excludes' to modify the exclude list.
Examples:
kernel*
This will exclude all packages start with kernel.
Guppi
This will exclude a package with the name Guppi
10.0 Conclusion
This document explains some of the basic functions of Yum Extender. Any feed back is appreciated.